If you’re looking to bring a touch of creativity to your space, it’s time to learn how to make 3D floor stickers. The impact of 3D floor stickers on interiors is undeniable. They can create optical illusions of depth that capture immediate attention when people enter the space.3D floor stickers have a great potential to transform a boring space into a high-impact experience. When designed and installed correctly, this artwork is perfect for:
- Retail,
- Exhibitions,
- Museums,
- Theme parks,
- Events,
- Bedrooms,
- And branded environments.
If you’re wondering how to make 3d stickers for floors and walls, this complete guide will cover:
- Designing
- Choosing materials,
- Printing,
- Installing,
- And after-installation care.
In addition, we’ll provide practical tips to keep your floor graphics durable and safe. So, stick around and find out more!
What Is a 3D Floor Sticker?
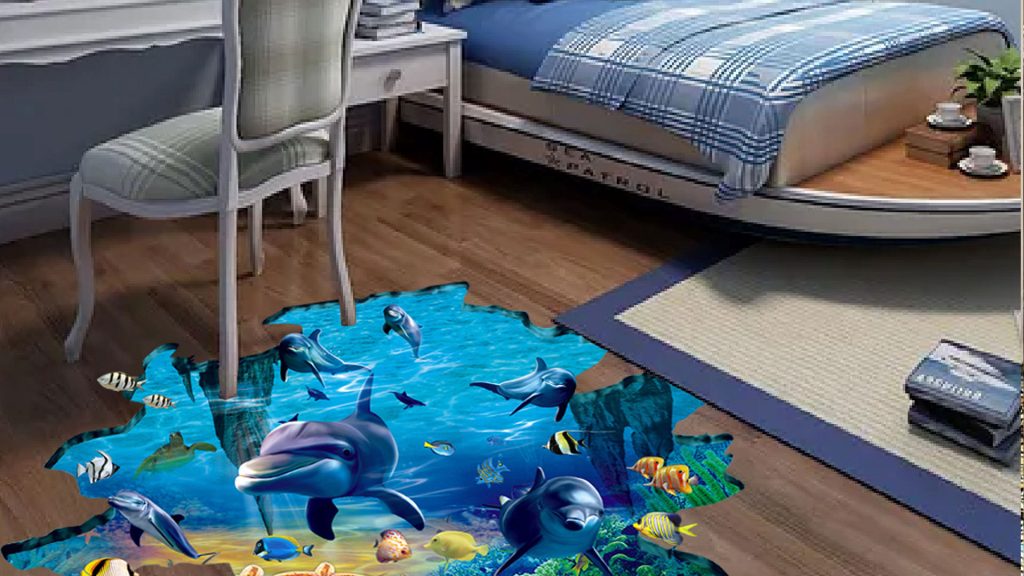
To know how to make 3D graphics, we should start with the meaning first. 3D floor stickers are vinyl decals that are applied to floors to create an illusion of depth and dimension. We use visual tricks to make the 3D sticker appear raised off the floor’s surface.

In short, they create the illusion that something is truly present, such as a scary 3D deep hole, a floating object, water, or steps. The printed vinyl decal can be applied to:
- Tile,
- Concrete,
- Wood,
- And epoxy.
The purpose is to use it to simulate depth with:
- Perspective,
- Shadows,
- And lighting.
So, to make the design pop out from a specific angle, you can transform Walls and Floors with Anamorphic Illusions.

How to Make 3D Stickers for Floors
If you’re wondering how to make a 3d sticker, you can just follow the steps below:
1. Plan the Space & Choose the Angle
First of all, you need to define:
- Where to install the 3D sticker,
- The foot-traffic level (is it a place people walk to often, or not?),
- The direction of lighting, which helps you design believable shadows,
- And the point where the illusion looks best.
2. Apply the Design Principles to Create 3D Floor Stickers
Illusion fundamentals make a difference in 3D artworks:
- Perspective: Making 2D look 3D.
- Shadows: Adding depth.
- Lighting & highlights: Making the effect pop out.
- Layering: Enabling stacks of elements to create depth.
- The believability boost: Making the 3D effect feel real.
3. Use the Right Materials to Make 3D Graphics
This is one of the most crucial steps. Don’t use generic sticker vinyl if you want your 3D floor sticker to survive foot traffic.
If you want to know how to create a more durable 3D floor sticker, here are the recommended materials:
- Floor graphic vinyl rated for pedestrian traffic
- Permanent or removable floor-grade adhesive (choose based on surface + duration)
- Anti-slip laminate
Keep in mind: Cast vinyl is the best for long-term performance, conformability, and premium installations. Also, calendared vinyl is cost-effective for short to medium campaigns.
4. Pick a Software to Make 3D Stickers
You need to use proper software to design and make a 3D sticker. We recommend the following tools for a professional 3D sticker:
- Adobe Photoshop
- Adobe Illustrator
- Blender / Cinema 4D
5. Provide the Production Essentials
Print, laminate, and cut. Professional print shops typically use:
- Eco-solvent, latex, or UV printing,
- Lamination,
- And contour cutting.
One important point is to make a checklist for:
- High-resolution textures
- Correct color profile
- Bleed
- Safe margins
- Proper cut path
6. Prepare the Surface to Make 3D Stickers
To accurately install the 3D floor sticker, follow the steps below:
- Clean with a pH-neutral cleaner to remove dust, grease, wax, and residues.
- Avoid oily cleaners.
- Make the floor completely dry.
- Check for cracks, loose tiles, peeling paint, or moisture issues.
Don’t forget: To prevent the sticker from bubbling, you must remove any moisture.
7. Install the 3D Floor Sticker
Let’s see the pro method to avoid bubbles and misalignment. Here’s a list of tools you’ll need to install your own 3D stickers:
- Squeegee with felt edge
- Measuring tape + masking tape
- Utility knife
- Roller
- Heat gun
Now that you have the tools, follow the steps below to create your sticker in Paint 3D.
- First, position the sticker temporarily to confirm spacing and direction.
- Next, tape a hinge.
- Now, peel the backing and apply gradually.
- When applying, push air toward the edges with steady, even squeegee passes.
- Then, press the sticker consistently with a roller.
- Finally, seal edges if needed for high-traffic areas.
Now you know how to install any 3D sticker, like the 3D skydiving mural, and grab attention!
How Is the Maintenance and Cleaning of a 3D Floor Sticker?
The more careful you are when cleaning and maintaining 3D stickers, the more durable they will be. Now, after learning how to make 3D stickers at home and installing them, it’s time to learn how to make them long-lasting:
- Don’t use harsh solvents to clean.
- Avoid hard brushes.
- Clean regularly to reduce sandpaper.
- Consider periodic laminate refresh or replacement planning.
Conclusion
In short, we’ve covered how to create 3D stickers easily. You learned what factors are really vital to make 3D stickers, how to move on this path step by step, and finally, how to install them.
If you’d like to skip all the extra steps and order your custom 3D floor stickers, Salso Design studio is here to help! We create and install 3D floor stickers for events and marketing campaigns. Make sure to contact us today!

FAQs on 3D Floor Stickers
Now, let’s review the most common questions about how to make 3D stickers with a short and concise answer for each:
Indeed, design typically takes 1–6+ hours, depending on
– Complexity,
– Printing,
– and finishing.
It usually requires 1–3 business days, and installation often takes 30 minutes to 2 hours. However, the more complex the projects are, the longer it takes.
The difficulties of creating 3D floor stickers vary from person to person. But generally, alignment on:
– Tile grout lines,
– Bubbles from poor prep,
– And edge lifting in high-traffic areas,
are the most common challenges. And the solutions are:
– Dry-fitting,
– Artful squeegee technique,
– And proper materials.
The most common error in making a 3D floor sticker is to use
– Cheap indoor sticker vinyl instead of floor-rated material,
– Skip the anti-slip laminate,
– Apply the graphic on dusty or oily floors,
– Design without a defined viewing angle,
– Use low-resolution textures that look fake right away,
– And ignore grout lines on tile.
Yes. Nowadays, thanks to the advanced software, such as Photoshop and Illustrator, you can design custom 3D floor illusions.